
Concession Nation will provide the customer with the GVWR, the tongue weight and the trailer weight before the trailer leaves for our facility. The customer shall be responsible to supply a 2 5/16 inch ball size and security lock to hook up the trailer to their hitch. Concession Nation strongly recommends the customer educates himself on choosing the appropriate vehicle to haul the trailer, and learn the correct way to hitch the trailer to the truck. We have gathered some information to educate consumers. Here are some tips to help you. Concession Nation shall not be held liable for any claims or damages, which may arise or occur after the customer has taken delivery of, or picked up the trailer from Concession Nation, Inc.’s business premises.
Tow Vehicle
Your tow vehicle is the truck you use to pull your custom concession trailer. You should research the towing capacity of your vehicle by looking up the year, make and model online and asking your dealer further questions such as the size of the hitch (class 2, 3 or 4). The tongue weight determines the hitch size you will need. It is crucial to factor the tongue weight along with the towing capacity of your vehicle to haul your trailer properly.
For example, a 2019 Ford F-250 has a towing capacity of 12,300 to 15,000 lbs but with a class 4 hitch it can support up to 2,900 lbs of tongue weight with the proper mount. The Dodge Ram 3500 can haul heavy concession trailers. It is also available with a diesel gooseneck towing capacity of up to 35,100 lbs. Please always check with your dealer regarding vehicle towing capacity specs.
")
")
")
 Safety Chain
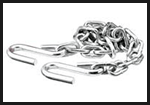 Safety Chain
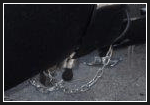
Our food trailer equipment includes two safety chains. These are used, and set up to cross under the coupler. In this way, if the coupler or hitch fails because of food trailer weight, the nose of the trailer will be caught by the safety chains, providing a measure of control while the tow vehicle stops. Use of safety chains is required by most, if not all states.
Coupler
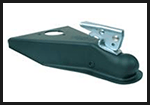
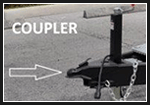 Coupler
The coupler is half of a flexible joint that allows your tow vehicle and trailer to turn corners and navigate bumps and dips. The coupler fits over the hitch ball, and is designed to articulate around the ball. The coupler and ball are important examples of food trailer equipment and must match in size to operate safely.
Hitch Ball
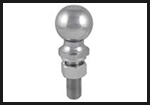 Hitch Ball
Also called a “tow ball”, the hitch ball is half of a flexible joint that allows your tow vehicle and trailer to turn corners and navigate bumps and dips. The coupler mounts and locks on top of the hitch ball and articulates around the hitch ball. The size needed for concession trailers is 2 5/16-inch.
Hitch Pin & Clip
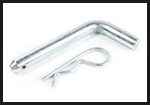 Hitch Pin & Clip
This pin holds the ball mount in the hitch and is a small but important bit of food trailer equipment. It is also a convenient attachment point for breakaway cables. Typically, a hitch pin is bent like a hockey stick, and drilled at one end to accept a hairpin-shaped retaining clip. A large bolt with a nut and a lock-washer is sometimes used in place of a hitch pin.
 Hookup Checklist
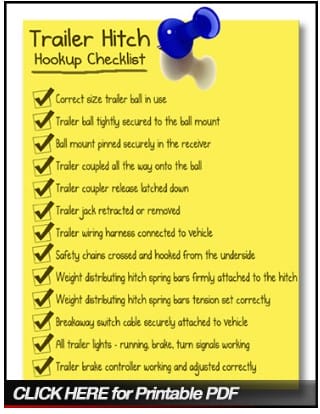
One way to be sure you’ve got your trailer ready to go is to make a checklist. If you keep this list in your tow vehicle’s glovebox, you can check each item and make sure you’re ready to go. You’ll want to adapt this list for your specific towing requirements:
Hooking Up Procedure
When you’ve got your receiver, hitch, wiring, and ball all in order, it’s time to hitch up your trailer and go! Although, it can be intimidating for a novice, the good news is that with a few easy tricks, a little practice, and the right food trailer equipment anyone can hook up to a trailer like a pro.
 Backing Up With a Helper
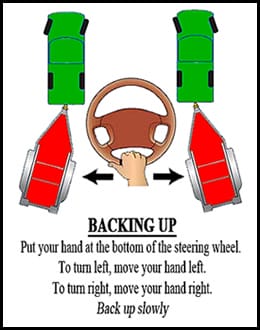 Backing Up With a Helper
A good helper knows how to pass information to the driver. Before you attempt to back up with a helper, establish what signals you expect to see. Chances are good that you can’t hear spoken or even shouted words, so you want to be sure that you’ve got your sign language in order.
Have the helper stand on the driver’s side of the trailer, about even with the trailer tongue. Make sure you can see the helper clearly in the side view mirror. The best signs do not involve which way to turn the steering wheel, but rather for the helper to indicate to bring the rear end of the tow vehicle “towards me” or “away from me.” Remember, you’ll be seeing the mirror image, so you want the directions to be easy to understand.
When you’re lined up, have the helper give you some clues about how far you need to go. These can be exaggerated and it’s best to err on the side of safety. Take it slowly and inch backwards for the last foot or two.
Eventually, you and your helper will learn to work together and you’ll be the envy of everyone watching. Until then, just accept the humor of the situation and you’ll do fine.
Backing Up Alone
Backing up your tow vehicle to the trailer without a spotter is a challenge for beginners. You have to get everything lined up very closely to get the trailer coupler onto the ball. There are a few handy tricks you can use, however. The easiest trick is to bring the trailer to your vehicle, if it’s light enough and you have a good surface to push the trailer around. But for those of us with heavier trailers, consider making (or buying) a brightly-colored stick mounted on a magnet. Place the magnet on the trailer coupler and you can easily see the stick through your vehicle’s rear window. Some inventive people also put a piece of tape on their rear window in line with their hitch to help them line up. Additionally, there are several products on the market that will help you with aligning your hookup. Most professional hitch installers or online trailer hitch stores should have some options.
When you are lined up and getting close – about a foot away – it’s time to stop and take a look. First, make sure to crank up your trailer jack so that the trailer coupler is high enough off the ground that your tow ball will not hit the coupler. That happens a lot, and it’s never good. For the last foot of distance, if you don’t have someone watching to tell you when you’re on the ball, just estimate the distance you need to move and leave your driver’s door open while you back up. It’s easier to gauge small distances if you watch the ground. With a little practice, you can back up to your trailer like a pro!
Fifth wheel and gooseneck hitches, though different pieces of food trailer equipment, are fundamentally the same. Because they are located in the bed of your truck, you need to be that much more careful backing up to avoid damage to your vehicle and the trailer.
Are You On The Ball?
When you finally have your trailer ball under the trailer coupler, you’ll need to use the trailer jack (or a floor jack) to lower the coupler onto the ball. Make sure the coupler is in the loose position and that the clamp in the coupler has dropped open. Food trailer equipment like these parts can stick often, especially if they haven’t been lubricated or used in a while.
If your coupler clamp has not released, the coupler will come down on the ball and it will look like it has covered the ball correctly, but nothing except gravity is holding it on the hitch! This is a major cause of breakaway accidents, so it pays to make sure. You should be able to feel the clamp around the bottom of the ball when the coupler is connected. If the clamp release doesn’t come down correctly, that’s a big clue that you’re not really on the ball.
 Hooking Up Procedure – Weight Carrying Hitch
 Hooking Up Procedure – Weight Carrying Hitch
When you’re on the ball, you need to make sure you connect up every part of your hitch. For a towing bumper or standard Class 1 through Class 5 receiver style hitch, the procedure is almost always the same. Study the picture in Figure 9-1 for reference:
Figure 9-1: A properly connected Weight Carrying Hitch
Step 1: Make sure that your coupler clamp lock is down and the release latch has hooked securely. Install a coupler safety pin or coupler lock if you have one. At minimum, make sure you use a coupler pin to keep the coupler lever from accidentally popping open. Completely stow or remove the trailer tongue jack.
Step 2: Check the hitch pin that holds your ball mount in the hitch receiver. You need a hitch pin clip in good condition or use a hitch pin lock to hold the ball mount in place. Makeshift retainers are not safe.
Step 3: Attach your safety chains, crossing them under the trailer coupler. Food truck equipment like chains helps to ensure that the coupler falls onto the crossed chains in the event of a breakaway and the food trailer weight will continue to be supported.
Step 4: Connect your trailer light wiring to your vehicle’s connector and check all of your lights, including the brake lights.
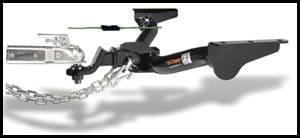
Hooking Up Procedure – Weight Distributing Hitch
If you are hooking up a weight distributing hitch, the procedure is a little different, and includes a few extra steps. Study the photo in Figure 9-2 for reference.
Figure 9-2: A properly connected “Round Bar” Weight Distributing Hitch
Step 1: Make sure that your coupler lever is locked down and the latch has hooked securely. Install a coupler lock if you have one. You can leave the jack partially extended for now.
Step 2: Check the hitch pin that holds your ball mount in the hitch receiver. You need a hitch pin clip in good condition or use a hitch pin lock to hold the ball mount in place. Makeshift retainers are not safe. If you connect your breakaway cable to the pin, do it now.
Step 3: Attach your safety chains, crossing them under the trailer coupler. This helps to ensure that the coupler falls onto the crossed chains in the event of a breakaway.
Step 4: Connect your trailer light wiring to your vehicle’s connector and check all of your lights, including the brake lights.
Step 5: Jack up the trailer tongue enough to take some weight off the trailer hitch. Insert the spring bars into the weight distributing hitch head and move them into position along the sides of the trailer tongue.
Step 6: Using the lift handle (usually provided with the weight distributing hitch,) move the hook-up brackets that are mounted on your trailer’s frame down to connect with the chains at the tapered end of each spring bar. When your hitch was set up, the installer should have told you how many links of chain to count for proper tension adjustment. If not, remember the goal is to be level throughout the tow vehicle and trailer. Using your lift handle, lift the hook-up brackets and pin them into place.
Step 7: Completely lower and stow the trailer tongue jack, allowing the weight to settle onto the tow vehicle.
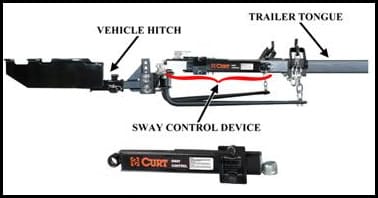 Step 8: If you have a sway control as shown in Figure 9-3, install it between your trailer frame and your ball mount. This is simply a friction-based device that significantly reduces or eliminates trailer sway.
Figure 9-3: Sway Control
Hooking Up Procedure – Gooseneck or Fifth Wheel Hitch
If you are hooking up a Gooseneck or a fifth wheel hitch, the procedure is a little different from a receiver and ball, but it is not more difficult.
Step 1: Lower the tailgate of the truck and make sure that your coupler is high enough to clear the lowered tail gate and bed of your truck and the height of your gooseneck ball or fifth wheel hitch. With a fifth wheel, grease the plates (you can also, and sometimes need to use a nylon lube plate) and then open the jaws. If you have a gooseneck, open the clamp latch on the Gooseneck coupler. This would be an excellent time to make sure that the Gooseneck ball in the bed of the truck is properly lubricated. Nothing will bother you or your horses more than the obnoxious squeaking of an un-lubricated ball.
Step 2: If you have a fifth wheel, the hitch has a V-shaped opening that will help the trailer’s kingpin find its way into the hitch. When the trailer has seated in the fifth wheel, the hitch snaps closed and your trailer is attached. With a Gooseneck, you must position the trailer’s coupler directly over the ball in the bed of your truck and lower the Gooseneck trailer into position and latch the clamp.
Step 3: Attach your safety chains. These attach in the vicinity of either kind of hitch. Remember that all trailers are required by law to have safety chains.
Step 4: Connect your trailer light wiring to your vehicle’s connector and check all of your lights, including your brake lights.
Step 5: Completely lower and stow the trailer jacks, allowing the food trailer weight to settle onto the tow vehicle.
*** Courtesy of the Hitch Guys http://www.hitchinfo.com ***
INQUIRE NOW | Concession Nation
Send us your information and one of our experts we’ll reach out shortly. To verify your phone number, you will receive a one-time SMS message. This message is only to confirm your number is valid. No marketing or promotional texts will be sent. Message and data rates may apply.